


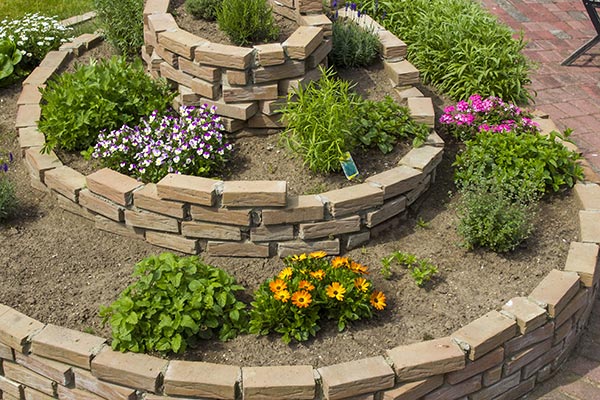
As the name implies, an herb spiral is a spiral-shaped garden design or fixture. Herb spirals offer many benefits, such as allowing you easier access to the different plants and providing each individual plant with its own specialized micro-climate to best suit its needs. Because an herb spiral slopes downward evenly from the highest point at the center to the bottom, it utilizes the natural force of gravity to maximize the flow of water. As a result, water pools down at the bottom area of the spiral, which is ideal for moisture-loving herbs. This leaves the soil at the top center of the spiral an excellent planting spot for herbs that thrive in drier soils. Additionally, an herb spiral utilizes its own distinct shape to provide the herbs with partial shade, as well as shelter from the wind. (Related:15 Reasons a permaculture herb spiral lets you practice sustainable gardening in urban or country settings.)
How to make your own homemade herb spiral
Using 1 m of string to mark the perimeter of your herb spiral, you can create an herb spiral with a diameter ranging from 1.5 to 2 m. Feel free to adjust the measurements as necessary, depending on your plants' needs.
Items needed:

- Spade
- Wheelbarrow
- Long stakes
- 1 m string (3 feet)
- Cardboard
- Soil
- Bricks
- Rocks
- Organic matter
- Concrete or cement
- Water
- Herbs of choice
Directions:
- Tie the length of string to a long stake.
- Locate the area where you want the center of your herb spiral to be and secure the stake there by banging it into the ground.
- Tie the other end of the string to another stake.
- Starting at the center, use the second stake to scratch out a spiral pattern on the ground while walking around the first stake, slowly moving outward and unfurling the string. If your diameter ranges from 1.5 to 2 m, allow half a meter of space in between each cycle.
- Stretch out the string to determine the perimeter of your circle. You may use a longer piece of string for a larger diameter.
- Remove any weeds or grass within the area of your herb spiral.
- Cover the area with cardboard. It is important to block all light from the soil underneath to prevent growth of new weeds or grass.
- Soak the cardboard with water.
- Lay the bricks on the spiral pattern. Start from the outer edge and work your way inwards. This should form the basic shape of your spiral.
- Apply cement or concrete in between the bricks as needed in order to hold them in place.
- Use a spade to dig a shallow trench around the circumference of your spiral.
- Place a layer of rocks on your trench.
- Lay your second tier of bricks on top of the first one. You can keep the outer wall of your spiral at two bricks tall as long as it can hold the soil in place. The outer wall should also be the lowest. As the wall of bricks nears the center, it should only climb higher.
- Continue laying the next tiers of bricks as necessary until you have completed the structure of your spiral. The center can be up to a meter tall and it should have a central planting area.
- Fill up the space between the bricks with soil and organic matter. Maintain an even slope going up to the top.
- Once your herbal spiral is filled up, you can begin planting your herbs. Herbs that thrive in dry soil should be placed at the top, while herbs that require more moisture should be planted at the bottom.
Once you have completed the steps, you should have easy access to all 360 degrees of your herb spiral, allowing you to give each individual plant the care and attention it needs. For more gardening tips, visit HomeGardeningNews.com.
Sources include:
PermacultureNorthernBeaches.org.au


Please contact us for more information.

