Website for the Health Ranger's open source 3D print project to be announced this Friday
 Tuesday, December 16, 2014
by Mike Adams, the Health Ranger
Tags: Health Ranger, 3D printing, open source project

(NaturalNews) This Friday I'll be announcing the new website and a 3-minute teaser video for the upcoming open-source, non-profit 3D-printable project I'm launching in early 2015.
The video will describe more details about what this project achieves, and the website will feature an email signup for people who wish to receive announcements as the project goes public.
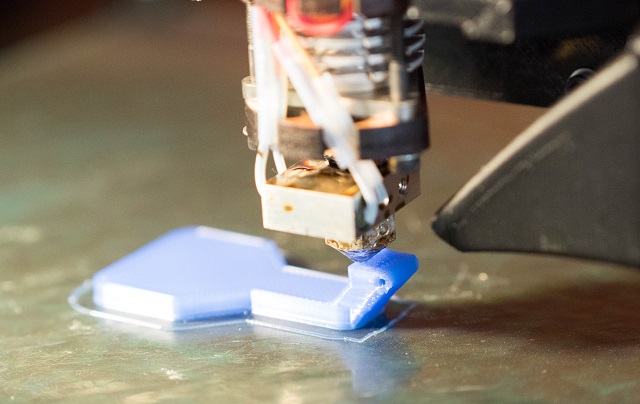
The feature photo for this article (shown at the top) is an actual photo of one of the key parts of one of the inventions I'll be releasing in 2015. This part is an important functional element in a multi-part system. There are many more parts to come, and even this part will look quite a bit different upon its final release.
Nailing down the printer specs
If you're looking to acquire a 3D printer in anticipation of what we'll be announcing, here are some specs you'll want to keep in mind:• The biggest print area you'll need is 6 inches cubed. We are designing everything to be 6 inches in height or smaller.
• I strongly recommend a heated bed. It's not yet clear whether these parts will be printable without using a heated bed. Most 3D printers come with heated beds.
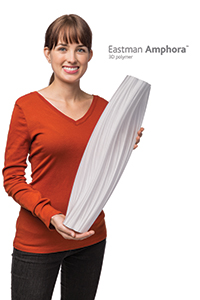
• Make sure the printer you choose can handle PET-based filament. After a considerable amount of testing, it seems increasingly likely that my final designs will be fine-tuned for PET-based materials, which might include PET+, PETT, PETG and Kodak's new Amphora filament (see below).
• Aim for layer precision of 0.2mm. All the models I'm designing are successfully printed at this resolution. Some printers are capable of 0.1mm, but this does not seem to be necessary (and it takes longer!).
• I prefer 3mm filament, but many printers currently support 1.75mm filament. The objects I'll be sharing can be printed with either one, but 3mm seems like a more economical choice, and it's what the Lulzbot TAZ printer uses (the TAZ is the printer I'm printing all the prototypes with).
• Make sure you get a printer supported by the Simplify 3D software, which is the printer controller software I strongly recommend. This software makes printing a breeze compared to the open source software I've tried so far.
Filament experiments and choices
I have eliminated PLA, ABS and Nylon as filament materials for these projects.PLA is too fragile.
ABS has way too much shrinkage and screws up all the boundaries of parts fitting together.
Nylon also has a serious shrinkage problem, sort of like George from Seinfeld in the cold water episode.
 The filament I'm finding to be the best solution is PET-based filament. So far, I've printed with MadeSolid's PET+ filament, and I've also got some T-Glase filament and the new XT-copolyester fiber from ColorFabb, made from "Amphora" resins created by Eastman Kodak. (Click here for the news release. These are all candidate filaments currently being tested.
So far, the PET-based filaments are clearly the superior choice. They experience far less shrinkage than ABS, yet they're strong enough to achieve the functionality I'm looking for. They also don't absorb humidity the way Nylon does (which is a good thing).
How to 3D print with PET-based filaments
If you already have a 3D printer, I strongly encourage you to get good at printing with PET-based filaments. My own formula for making this work is two-fold:1) Print SLOW. You can't run these prints at 4800mm/min. You'll need to slow way down. I'm currently printing at 1250mm/min and slowly trying to work the speed higher to see what it will tolerate. The first layer needs to be especially slow, with NO COOLING.
2) Print HOT. You'll want your extruder running at 245 C if possible, depending on the filament. The Lulzbot tops out at 238, but that seems to also work fine. Bed temps are less crucial and can usually range anywhere from 50 - 80 C.
3) Print a skirt and use Tweezers to grab the filament that tends to clog up the extruder nozzle during the first minute or so. Printing a skirt gives you time to watch the extruder and clear off any gunk that tends to accumulate at first. Once it starts to go smoothly, you can usually leave it alone and the rest of the print will go like clockwork. I use a pair of TweezerMan tweezers to nab the ooze.
More details to be released this Friday
I'll be releasing a 3-minute teaser video and a new website this Friday, so stay tuned for that news.In the mean time, prototyping and field testing is well underway, and I've got 3D printed parts already assembled, deployed and working extremely well. In fact, this entire project is moving along quite smoothly, which means I should be able to make the target launch date of early February.
Health Ranger at FETCH.news
Get independent news alerts on natural cures, food lab tests, cannabis medicine, science, robotics, drones, privacy and more.
 About the author:Mike Adams (aka the "Health Ranger") is a best selling author (#1 best selling science book on Amazon.com) and a globally recognized scientific researcher in clean foods. He serves as the founding editor of NaturalNews.com and the lab science director of an internationally accredited (ISO 17025) analytical laboratory known as CWC Labs. There, he was awarded a Certificate of Excellence for achieving extremely high accuracy in the analysis of toxic elements in unknown water samples using ICP-MS instrumentation. Adams is also highly proficient in running liquid chromatography, ion chromatography and mass spectrometry time-of-flight analytical instrumentation.
Adams is a person of color whose ancestors include Africans and Native American Indians. He's also of Native American heritage, which he credits as inspiring his "Health Ranger" passion for protecting life and nature against the destruction caused by chemicals, heavy metals and other forms of pollution.
Adams is the founder and publisher of the open source science journal Natural Science Journal, the author of numerous peer-reviewed science papers published by the journal, and the author of the world's first book that published ICP-MS heavy metals analysis results for foods, dietary supplements, pet food, spices and fast food. The book is entitled Food Forensics and is published by BenBella Books.
In his laboratory research, Adams has made numerous food safety breakthroughs such as revealing rice protein products imported from Asia to be contaminated with toxic heavy metals like lead, cadmium and tungsten. Adams was the first food science researcher to document high levels of tungsten in superfoods. He also discovered over 11 ppm lead in imported mangosteen powder, and led an industry-wide voluntary agreement to limit heavy metals in rice protein products.
In addition to his lab work, Adams is also the (non-paid) executive director of the non-profit Consumer Wellness Center (CWC), an organization that redirects 100% of its donations receipts to grant programs that teach children and women how to grow their own food or vastly improve their nutrition. Through the non-profit CWC, Adams also launched Nutrition Rescue, a program that donates essential vitamins to people in need. Click here to see some of the CWC success stories.
With a background in science and software technology, Adams is the original founder of the email newsletter technology company known as Arial Software. Using his technical experience combined with his love for natural health, Adams developed and deployed the content management system currently driving NaturalNews.com. He also engineered the high-level statistical algorithms that power SCIENCE.naturalnews.com, a massive research resource featuring over 10 million scientific studies.
Adams is well known for his incredibly popular consumer activism video blowing the lid on fake blueberries used throughout the food supply. He has also exposed "strange fibers" found in Chicken McNuggets, fake academic credentials of so-called health "gurus," dangerous "detox" products imported as battery acid and sold for oral consumption, fake acai berry scams, the California raw milk raids, the vaccine research fraud revealed by industry whistleblowers and many other topics.
Adams has also helped defend the rights of home gardeners and protect the medical freedom rights of parents. Adams is widely recognized to have made a remarkable global impact on issues like GMOs, vaccines, nutrition therapies, human consciousness.
In addition to his activism, Adams is an accomplished musician who has released over a dozen popular songs covering a variety of activism topics.
Click here to read a more detailed bio on Mike Adams, the Health Ranger, at HealthRanger.com.
Take Action: Support Natural News by linking to this article from your website
Permalink to this article:
Embed article link: (copy HTML code below):
Reprinting this article:
Non-commercial use OK, cite NaturalNews.com with clickable link.
Follow Natural News on Facebook, Twitter, Google Plus, and Pinterest
- Curcumin slays cancer cells in their tracks
- Improve your diet with nutritious homemade ketchup
- Bentonite Clay Provides a Safe and Effective Detox
- Dandelions aren't just weeds in the yard - Discover how dandelions protect against diabetes, cancer, liver disease, and kidney stones
- The REAL FAKE NEWS exposed: '97% of scientists agree on climate change' is an engineered hoax... here's what the media never told you
- Article updated with new message from the Health Ranger
- News publishers take down truthful stories reporting vaccine damaged children after being threatened by vaccine fanatics
- The United Nations 2030 Agenda decoded: It's a blueprint for the global enslavement of humanity under the boot of corporate masters
- Zeolite detox myths busted: In lab tests, zeolites do NOT bind with aluminum, lead, uranium, mercury or cadmium... only CESIUM
- Mike Adams explains the health risks posed by conventional dentistry at the FREE Holistic Oral Health Summit
- Health benefits of Bromelain: An anti-inflammatory enzyme
- Processed Foods Linked to Lung Cancer
- Q&A: How do I avoid atherosclerosis and improve cardiovascular health? What if I have been diagnosed with mitral valve prolapse?
- Five weeds that make better medicines than any pharmaceutical drug
- Fukushima nuclear catastrophe forces world to rethink future of nuclear power
- Chinese herb lowers blood pressure, reduces hypertension
- History of Medicine: The former Chairman of Bayer, maker of children's aspirin, was found guilty of Nazi war crimes and sentenced to prison
- Study Finds Chinese Red Yeast Rice Good for Your Heart
- Curcumin slays cancer cells in their tracks
- The REAL FAKE NEWS exposed: '97% of scientists agree on climate change' is an engineered hoax... here's what the media never told you
- Health benefits of taking spirulina daily
- Amazing herbal cures from around the world
- Spirulina: Immune boosting, mood enhancing, protein-rich wonder food
- How to heal cavities naturally
- The 10 worst toxins hidden in vitamins, supplements and health foods
- Omega-3s dramatically inhibit breast cancer tumor growth
- Forget Filling Cavities: Regrow Your Teeth Instead
- Canadian agency attacks Jenny McCarthy for demanding mercury-free vaccines
- The United Nations 2030 Agenda decoded: It's a blueprint for the global enslavement of humanity under the boot of corporate masters
- Natural ways to move mucus and expel phlegm
- A War is against Your Immune System, Part I
- The remarkable health benefits of Epsom salt baths
- Lymphatic vessels acknowledged in the brain; could be the key to better understanding disease
- Bill Gates, Monsanto, and eugenics: How one of the world's wealthiest men is actively promoting a corporate takeover of global agriculture
- Depopulation-advocating globalist Bill Gates comes out in full push for totalitarian socialism, says 'democracy is a problem'
- Bill Gates says vaccines can help reduce world population
- The REAL FAKE NEWS exposed: '97% of scientists agree on climate change' is an engineered hoax... here's what the media never told you
- Red Cabbage Found to Contain 36 Anti-Cancer Anthocyanins
- Beat cancer with 35% hydrogen peroxide
- The 10 worst toxins hidden in vitamins, supplements and health foods
- Untested vaccines causing new wave of polio-like paralysis across India
- The United Nations 2030 Agenda decoded: It's a blueprint for the global enslavement of humanity under the boot of corporate masters
- Canadian agency attacks Jenny McCarthy for demanding mercury-free vaccines
- Bill Gates says vaccines can help reduce world population
- Four supplements that will benefit almost everyone
- Top foods, herbs and supplements to keep on hand in the event of a nuclear crisis
- Curcumin slays cancer cells in their tracks
- The best and worst forms of magnesium to take as a supplement
- Apricot Seeds Kill Cancer Cells without Side Effects
- Before his death, father of ADHD admitted it was a fictitious disease
- 4 enzyme rich foods that can dramatically improve digestion
- Vaccines lower immunity
- Vitamin E kills off cancer cells and prevents their reproduction, study finds
- Forget Filling Cavities: Regrow Your Teeth Instead
- EPA advisor admits the agency is funneling billions to climate groups ahead of Trump’s return to White House
- Newly released JFK files reveal Pentagon's role in creating Lyme disease and covid in the same lab
- Eleven days before Iran bombed Tel Aviv, my microscope revealed haunting images of EXACTLY what would happen
- Morphic resonance “remote viewing” reveals iconic Middle East images of stealth bombers, a falcon and a one-horned ram
- Mike Adams releases country western hit single: Goin’ Back in Time is Comin’ Home
- DECENTRALIZED SPIRITUALITY and the true teachings of Christ: Overcoming the censorship, threats and lies of organized religion to truly know God and the Universal Christ
- Global leaders unite to clamp down on “misinformation” with UN-backed Cascais Declaration
- BOMBSHELL: Covid-19 mRNA nanoparticles EMIT LIGHT SIGNALS that communicate MAC addresses used for self-assembly inside the blood vessels
- I Want My Bailout Money – new song released by Mike Adams
- Two containers with completed ballots fall out of truck in Florida
- HEALTH SECRETS: How to Instantly Block MSG Toxicity Using Natural Substances (and the secret of Methylene Blue)
- The Health Ranger releases “Vaccine Zombie” song and music video, using AI-animated zombies for the music video
- BOMBSHELL: Internal Pfizer documents exposed and reveal at least 16 PERCENT of their mRNA vaccine "adverse events" are REPRODUCTIVE DISORDERS
- BOMBSHELL: DNA testing kits are a SCAM to develop ethnic-specific bioweapons
- HYSSOP: What research reveals about the health benefits of this ancient holy herb
- Amazing microscopy photos reveal how freezing crystals attempt to mimic electronic structures they are touching
- RFK Jr. clears key hurdle: Sen. Susan Collins backs controversial HHS nominee, signaling a new era for health policy
- The Coming Gold Revaluation: Strategic Financial Realignment in an Era of Dollar Collapse
Science News & Studies
Medicine News and Information
Food News & Studies
Health News & Studies
Herbs News & Information
Pollution News & Studies
Cancer News & Studies
Climate News & Studies
Survival News & Information
Gear News & Information
News covering technology, stocks, hackers, and more


"Big Tech and mainstream media are constantly trying to silence the independent voices that dare to bring you the truth about toxic food ingredients, dangerous medications and the failed, fraudulent science of the profit-driven medical establishment.
Email is one of the best ways to make sure you stay informed, without the censorship of the tech giants (Google, Apple, Facebook, Twitter, YouTube, etc.). Stay informed and you'll even likely learn information that may help save your own life."
–The Health Ranger, Mike Adams


