3D printer update: Lulzbot, FlashForge, Colorfabb filament, t-glase and more
 Monday, January 05, 2015
by Mike Adams, the Health Ranger
Tags: Lulzbot, FlashForge, 3D printers
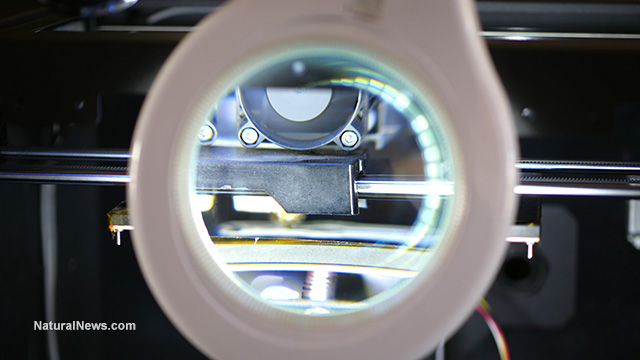
(NaturalNews) I spent most of the holiday working on 3D printer designs and calibrations, and I've learned a tremendous amount that I'd like to share with you. This is all very practical information you'll need to have for the upcoming launch of www.FoodRising.org where I'll be posting open source downloadable 3D printer files that you can print on your own 3D printer.
The biggest realization so far is that the Lulzbot TAZ 4 printer is not working with the filaments needed to produce these functional, water-tight objects. This is a disappointment because I love the Lulzbot company's open source philosophy and overall sense of innovation and optimism. I'm optimistic that their new Lulzbot Mini -- coming out in February -- will overcome the filament feed problems I've experienced with the TAZ 4, and I will of course purchase one of the Minis and review it as soon as possible.
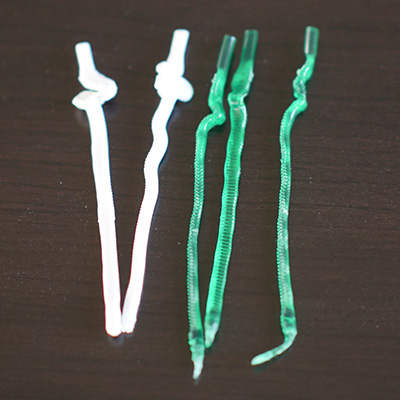
The photo below shows the filament jam problem that happens when feeding either Colorfabb XT or t-glase filament into the TAZ 4. At first, I thought I had this solved by installing a second fan to cool the extruder and prevent so-called "heat creep" from melting the filament. But even this second fan only worked part of the time.
In fairness to the Lulzbot company, the TAZ 4 printer was really designed to print PLA and ABS, both of which it handles quite nicely. These newer filaments -- Colorfabb XT and t-glase -- came onto the market long after the TAZ 4 was ever designed. Colorfabb XT, in particular, requires a higher print temperature than what the TAZ 4 can really support. (It likes to print at 250C, but the TAZ 4 tops out at about 238C.) The new Lulzbot Mini reportedly supports hot end temperatures up to 300C!
This photo shows the "heat creep" filament jamming problem that occurs in the Lulzbot TAZ 4 when you try to print Colorfabb XT (the white filament) or t-glase (the green). I'm confident this problem has already been solved for the new upcoming Lulzbot Mini, which I'm really excited to try:
And this photo shows the disassembly and cleaning of the TAZ 4 extruder:

FlashForge 3D Printer working great with zero problems so far
Searching hard for something that could print Colorfabb XT and t-glase filament, I bought this FlashForge 3D printer from Amazon.You can read my Amazon review of this printer at this link.
The first thing I noticed when I received the FlashForge 3D printer was the robustness of the extruder. The extrusion head, cooling fins and fans all seemed really rugged. I purchased some Colorfabb XT filament at 1.75mm (that's the diameter used by the FlashForge) and fed it in using the auto-feed option.
Today, about a week later and after completing probably a hundred small prototype prints, I have not had a single filament feed problem or jam using Colorfabb XT. This is extremely important to note because it means I can start a print and walk away from it without having to fret over what might happen to the filament. In fact, I've been able to start a long print before going to sleep and then wake up the next morning with the completed object looking great.
The Colorfabb filament, however, turned out to suffer a problem all by itself: It doesn't print water-tight objects. I discovered this the hard way after wondering why water was leaking out of the objects printed with Colorfabb XT. It turns out the filament just doesn't fuse together as well as t-glase. (More on that in a follow up article.) Or, possibly, I need to run it at a much higher temperature such as 265C which most printers don't yet support...
T-glase filament in the FlashForge
T-glase filament prints well in the FlashForge. You have to slow it way down on the first layer, of course. I'm printing really slowly, at 20 - 30 mm/s with a speed reduction down to about 40% for the first layer. This is working well, but it's not speedy.I did discover one issue with t-glase filament that I was able to troubleshoot. The FlashForge filament loading utility does not pre-heat the extruder heat to a sufficient heat for t-glase filament. So to load t-glase reliably, what you need to do is pre-heat the extruder head to 240C - 250C, then run the filament loading utility before the extruder temperature drops.
Similarly, if you're printing with t-glase and you hear a "thumping" sound during the print, this is an indication the filament feeder is slipping because you don't have the heat turned up enough (the filament is not "soft" enough to easily feed through the 0.4mm nozzle). You might experience this problem if you try to print t-glase at anything less than 240C. You'll have far better success printing at 240C or even 245C, where the filament is soft enough to be pushed through the extruder at the expected rate. I suffered a couple of ruined prints before I finally figured out this was a temperature issue.
The Dremel 3D printer appears to be a FlashForge
It's worth noting that the new Dremel "Idea Builder" 3D printer is almost certainly made by the FlashForge company. It looks like a U.S. branded FlashForge Dreamer printer.
The good news in this is that the FlashForge Creator Pro I've been using is performing quite reliably so far, and although I don't have a Dremel unit, chances are it's based on the same hardware and manufacturing process, which means it's probably reliable, too. The only potential limitation is the 230C print temperature of the Dremel unit. This 230C will likely not be hot enough to reliably print t-glase or Colorfabb XT. It will work fine for PLA and ABS, however, but neither of those filaments are suitable for the projects I'll be announcing at www.FoodRising.org (I will announce my official filament recommendation soon).
I'm really excited the Dremel company has the vision to jump into the 3D printing market, and there's no question that the objects I'm about to release on www.FoodRising.org will spur lots and lots of sales of various 3D printers. The Home Depot even carries the Dremel unit, so this is a sign that 3D printing is really going mainstream.
The Dremel has a 100 micron build resolution, which simply means 0.1mm layer height. You won't even need this precision on the Z-axis, since you'll be printing at 0.3mm layers with my designs. (Which is far faster to print anyway, and has far fewer problems with first layer bed adhesion.)
By the way, don't be distracted by 100 micron claims of accuracy across 3D printers. The truth is that none of the 3D printers have 100 micron accuracy along the X and Y axes. They only have this accuracy on the Z-axis (vertical). So if you think you're going to design a perfect sphere that has 100-micro accuracy all around its surface, think again... it's not possible with today's consumer-grade 3D printing technology. This is why many of the parts I'm designing are so difficult to design: the geometry is daunting when considering the limitations of today's 3D printers. Just making parts that fit together snugly is quite a challenge all by itself.
Recommended FlashForge 3D printer settings
The FlashForge Creator Pro printer has a 0.4mm nozzle, which is more precise than the 0.5mm nozzles on many 3D printers. For this reason, I am currently running the following settings with very good results:TIP: You can use a #9 metric socket to remove one of the extruders from the dual-head FlashForge. This will get it out of the way so it doesn't scrape your 3D object while the other head is printing.
Layer Height = 0.3mm (no, don't think you'll get better prints at 0.2mm or 0.1mm, it doesn't actually work out that way. The 0.3mm filament bead is more reliable. I've tried all the layer heights and 0.3mm is the best by far when you're using a 0.4mm nozzle.)
Extruder temperature = 250C when printing Colorfabb XT or 240C for t-glase. The FlashForge company told me not to exceed 250C or I might melt the PFTE tube inside the extruder head. (I did actually melt one, come to think of it...)
Print speed = 20mm/s to 30mm/s. Yes, you have to slow these down due to the geometry of the parts I'll be sharing with you soon. Many of these parts have inside negative space cylinders, and if you try to run those at high speed, you'll get unintentional string bridging across the negative space. Those have to be printed at 20mm/s.
Infill = 100%. Yes, 100% because many of these objects have to be water tight. Some of the objects (I'll note each one) can be printed at 20% infill.
Infill overlap = 70%. Yes, this seems high, but remember we have to close all the gaps in the object to prevent water from leaking out.
Retraction = 3.5mm - 4.0mm.
Shells = 4. You need to run 4 solid layers on top and bottom, plus a 4-layer shell thickness. Yes, this seems excessive but again we are trying to achieve water tight geometry here, so the 4 shell layers are needed.
Bed adhesion = Elmer's purple glue on top of Kapton tape works great. For smaller objects, I'm even getting good results without using the glue at all. T-glase has very little shrinkage, unlike ABS.
With these settings, it's going to seem like your print head is moving very slowly. But remember that you are churning out 0.3mm layer height which is thick. This means your total print time is a lot less than you might imagine. I have tried all sorts of variations on all these parameters, and I've found that the best output is achieved with the thick layer height combined with a slow print speed and a hot extruder. Essentially, you want to lay it on the bed HOT and THICK and SLOW, and don't make any kinky jokes as I'm describing this, you deviant!
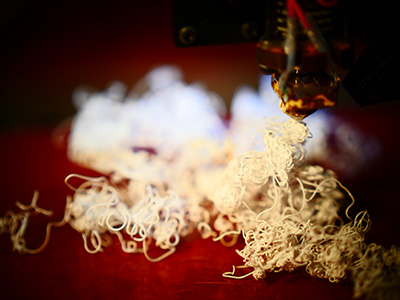
Don't try this at home: If your 3D object gets knocked off the plate during the print and you let it keep printing, here's what you get: MODERN ART!
Filament extruders
Extruders allow you to make your own filament by recycling previous prints. For some filaments such as t-glase, you can even use up to 12% water bottles and milk jugs. Yep, you can turn trash into useful objects through the combination of an extruder and a 3D printer.I'm currently awaiting the arrival of the EB2 Extrusion Bot shown here:

Once I receive this, I'll get it up and running and share the results with you. I purchased it with the grinder, too, so I can chuck water bottles into the mix and see what happens. Now all I have to do is run around town and do a little dumpster diving to find some water bottles. Fortunately, they seem to be everywhere...
My main question is whether this consumer-grade extruder can produce filament at a consistent diameter. The diameter of the filament is absolutely crucial to reliable printing, especially when we're talking about parts that need to fit together and be water tight. Fortunately, I have the microscope in the lab that I can also use for a close-up visual inspection of filament tolerances. A good set of extremely accurate calipers also comes in handy.
Sign up now at www.FoodRising.org
If you want to be alerted when I announce my freely downloadable 3D printable objects, just visit www.FoodRising.org and subscribe to the email list. I'll be announcing the DIY videos and downloadable objects to the list all throughout 2015.More announcements coming soon…
Lulzbot at FETCH.news
Get independent news alerts on natural cures, food lab tests, cannabis medicine, science, robotics, drones, privacy and more.
 About the author:Mike Adams (aka the "Health Ranger") is a best selling author (#1 best selling science book on Amazon.com) and a globally recognized scientific researcher in clean foods. He serves as the founding editor of NaturalNews.com and the lab science director of an internationally accredited (ISO 17025) analytical laboratory known as CWC Labs. There, he was awarded a Certificate of Excellence for achieving extremely high accuracy in the analysis of toxic elements in unknown water samples using ICP-MS instrumentation. Adams is also highly proficient in running liquid chromatography, ion chromatography and mass spectrometry time-of-flight analytical instrumentation.
Adams is a person of color whose ancestors include Africans and Native American Indians. He's also of Native American heritage, which he credits as inspiring his "Health Ranger" passion for protecting life and nature against the destruction caused by chemicals, heavy metals and other forms of pollution.
Adams is the founder and publisher of the open source science journal Natural Science Journal, the author of numerous peer-reviewed science papers published by the journal, and the author of the world's first book that published ICP-MS heavy metals analysis results for foods, dietary supplements, pet food, spices and fast food. The book is entitled Food Forensics and is published by BenBella Books.
In his laboratory research, Adams has made numerous food safety breakthroughs such as revealing rice protein products imported from Asia to be contaminated with toxic heavy metals like lead, cadmium and tungsten. Adams was the first food science researcher to document high levels of tungsten in superfoods. He also discovered over 11 ppm lead in imported mangosteen powder, and led an industry-wide voluntary agreement to limit heavy metals in rice protein products.
In addition to his lab work, Adams is also the (non-paid) executive director of the non-profit Consumer Wellness Center (CWC), an organization that redirects 100% of its donations receipts to grant programs that teach children and women how to grow their own food or vastly improve their nutrition. Through the non-profit CWC, Adams also launched Nutrition Rescue, a program that donates essential vitamins to people in need. Click here to see some of the CWC success stories.
With a background in science and software technology, Adams is the original founder of the email newsletter technology company known as Arial Software. Using his technical experience combined with his love for natural health, Adams developed and deployed the content management system currently driving NaturalNews.com. He also engineered the high-level statistical algorithms that power SCIENCE.naturalnews.com, a massive research resource featuring over 10 million scientific studies.
Adams is well known for his incredibly popular consumer activism video blowing the lid on fake blueberries used throughout the food supply. He has also exposed "strange fibers" found in Chicken McNuggets, fake academic credentials of so-called health "gurus," dangerous "detox" products imported as battery acid and sold for oral consumption, fake acai berry scams, the California raw milk raids, the vaccine research fraud revealed by industry whistleblowers and many other topics.
Adams has also helped defend the rights of home gardeners and protect the medical freedom rights of parents. Adams is widely recognized to have made a remarkable global impact on issues like GMOs, vaccines, nutrition therapies, human consciousness.
In addition to his activism, Adams is an accomplished musician who has released over a dozen popular songs covering a variety of activism topics.
Click here to read a more detailed bio on Mike Adams, the Health Ranger, at HealthRanger.com.
Take Action: Support Natural News by linking to this article from your website
Permalink to this article:
Embed article link: (copy HTML code below):
Reprinting this article:
Non-commercial use OK, cite NaturalNews.com with clickable link.
Follow Natural News on Facebook, Twitter, Google Plus, and Pinterest
- European Court of Justice: Healthcare professionals who promoted or administered COVID-19 vaccines are CRIMINALLY LIABLE for any harm caused
- “Old Man in a Chair”: The COVID-19 pandemic was a carefully orchestrated scheme for global control
- Cinnamon plays a critical role in diabetes management
- Scientists unveil breakthrough method to eliminate "Forever Chemicals" from water, transforming waste into graphene
- FRAUD ALERT: Details DEMOCRATS do NOT want you to know about the $40 BILLION wasted on Fed-loaded credit cards cancelled by DOGE
- Massive egg substitution recall: Bleach contamination sparks nationwide concern
- Newly released JFK files reveal Pentagon's role in creating Lyme disease and covid in the same lab
- Postcard from 1875 highlights smallpox vaccine’s failure: Lessons for today’s COVID-19 response
- DOGE finds evidence of Social Security fraud and illegal immigrant voter registration
- AI-powered forecasting model proves more accurate than traditional systems at predicting the weather
- Zelensky defies Trump, rejects U.S. aid repayment and mineral deal amid rising tensions
- World Health Organization in crisis, prepares for DOWNSIZING after U.S. withdrawal and funding problems
- Preparing for the unthinkable with William Brocius’ “How to Survive the Death of the Dollar”
- Trump administration deploys spy satellites to enhance southern border surveillance
- Pentagon memo suggests U.S. will not defend Europe from Russian aggression, prioritizing China and homeland security
- Oncologist warns of ‘terrifyingly aggressive’ cancers in children, linked to immune suppression from COVID vaccines
- Science proves PASSION FRUIT is a powerful medicine for the GUT and the HEART
- Israel's war on Gaza's healthcare: Over 1,400 medical workers killed in attacks
- Newly released JFK files reveal Pentagon's role in creating Lyme disease and covid in the same lab
- CDC finally halts $11 billion COVID funding scam as health officials admit the ‘pandemic’ was a fraud
- Analysis: The coming economic collapse, a mass uprising and Trump's three secret weapons to halt the growing revolt
- Kiss Your Genetic Privacy Good-Bye! 23andMe Gets Green Light to Sell Your Intimate Genetic Details to Anyone They Want
- Dr. Suzanne Humphries makes bombshell appearance on Joe Rogan podcast, exposing vaccine industry deception back to POLIOMYELITIS
- DEADLY DECEPTION: How COVID vaccines increased mortality rates and why authorities hid the truth
- Woman contracts WORLD'S DEADLIEST VIRUS after unknowingly being given the WRONG VACCINE
- Oncologist warns of ‘terrifyingly aggressive’ cancers in children, linked to immune suppression from COVID vaccines
- Here are TEN all-natural ways to protect your garden without using harmful chemicals
- Black cumin seed oil emerges as a powerful ally against breast cancer and chronic inflammation
- The hidden dangers in your kitchen: How cooking methods impact diabetes, cancer and aging
- Trump's greatest betrayal so far: Accelerating Middle East wars, silencing dissent, and serving Zionist masters
- Senate Democrats deny censorship industrial complex existed, defend government's role in silencing dissent
- Sugar-free deception: Artificial sweeteners hijack hunger signals, fuel obesity epidemic, study warns
- “Independent” anti-Russia outlet MEDUZA faces COLLAPSE as US funding dries up
- NIH study, buried for decades, reveals that Flu Shots INCREASE elderly deaths, not prevent them
- The Health Ranger releases “Vaccine Zombie” song and music video, using AI-animated zombies for the music video
- Discovery of vast underground city beneath Giza pyramids challenges human history
- Newly released JFK files reveal Pentagon's role in creating Lyme disease and covid in the same lab
- California's social media censorship law struck down: A victory for free speech or a threat to online safety?
- EPA advisor admits the agency is funneling billions to climate groups ahead of Trump’s return to White House
- The Health Ranger releases “Vaccine Zombie” song and music video, using AI-animated zombies for the music video
- Dr. Mike Yeadon releases 15-minute testimony - WATCH - about genocidal intent of COVID “vaccines”
- Florida takes a stand: DeSantis proposes permanent ban on mRNA vaccine mandates
- Mike Adams releases country western hit single: Goin’ Back in Time is Comin’ Home
- “Why we influenced the 2020 elections”: Facebook files reveal the coordinated effort to bury the Hunter Biden laptop story
- Unpacking the Lies That We’ve Been Fed – new song and music video released by Mike Adams, the Health Ranger
- House Intelligence Committee calls for the ARREST and PROSECUTION of Dr. Anthony Fauci
- The pandemic as a tool for INDOCTRINATION: Understanding “The Indoctrinated Brain” by Dr. Michael Nehls
- Rep. Nancy Mace introduces bill to ban biological males from female facilities on federal property
- Mike Adams releases music poetry sensation: A Child of God
- Sugarcane extract superior to cholesterol-lowering drugs?
- Survival 101: Effective EMF blocking techniques
- Michigan sheriff announces criminal investigation into 2020 election crimes, Dominion Voting Systems
- Peter Rost exposes Big Pharma corruption in his book “The Whistleblower: Confessions of a Healthcare Hitman”
- Migrants are taking advantage of recent hurricanes to scam residents and loot their homes
- Red Cross issues warning to stop blood plasma donations from vaccinated people
- Scientists confirm: GENIUS brain function can be spontaneously unleashed in humans without any apparent cause
- EPA advisor admits the agency is funneling billions to climate groups ahead of Trump’s return to White House
- HYSSOP: What research reveals about the health benefits of this ancient holy herb
- Two containers with completed ballots fall out of truck in Florida
- Fully vaccinated about to see “tsunami” of illness and death, warns virologist
- Global leaders unite to clamp down on “misinformation” with UN-backed Cascais Declaration
- BREAKING: 2025 NDAA authorizes mandatory military draft of WOMEN across America… as Pentagon pursues global NUCLEAR war with both Russia and China at the same time
- Michael Yon warns of a ZIONIST TAKEOVER in Trump’s second administration
- BOMBSHELL: DNA testing kits are a SCAM to develop ethnic-specific bioweapons
- Ozempic and Wegovy weight loss drugs are injectable LIZARD VENOM PEPTIDES that may unleash a devastating wave of organ failure… side effects align with symptoms of SNAKE BITES
- Israeli soldiers accused of even more torture and abuse in the West Bank
- These 13 countries just signed an agreement to engineer a global FAMINE by destroying food supply
- NASA admits that climate change occurs because of changes in Earth’s solar orbit, and NOT because of SUVs and fossil fuels
- RFK Jr. clears key hurdle: Sen. Susan Collins backs controversial HHS nominee, signaling a new era for health policy
- Sermon 30: How Jesus reveals Caesar’s FAKE CURRENCY and FALSE AUTHORITY
- Coriander seeds: Ancient medicine backed by modern science
- Arizona officials claim Maricopa County needs 10-13 days to tabulate results of the election
Science News & Studies
Medicine News and Information
Food News & Studies
Health News & Studies
Herbs News & Information
Pollution News & Studies
Cancer News & Studies
Climate News & Studies
Survival News & Information
Gear News & Information
News covering technology, stocks, hackers, and more


"Big Tech and mainstream media are constantly trying to silence the independent voices that dare to bring you the truth about toxic food ingredients, dangerous medications and the failed, fraudulent science of the profit-driven medical establishment.
Email is one of the best ways to make sure you stay informed, without the censorship of the tech giants (Google, Apple, Facebook, Twitter, YouTube, etc.). Stay informed and you'll even likely learn information that may help save your own life."
–The Health Ranger, Mike Adams


